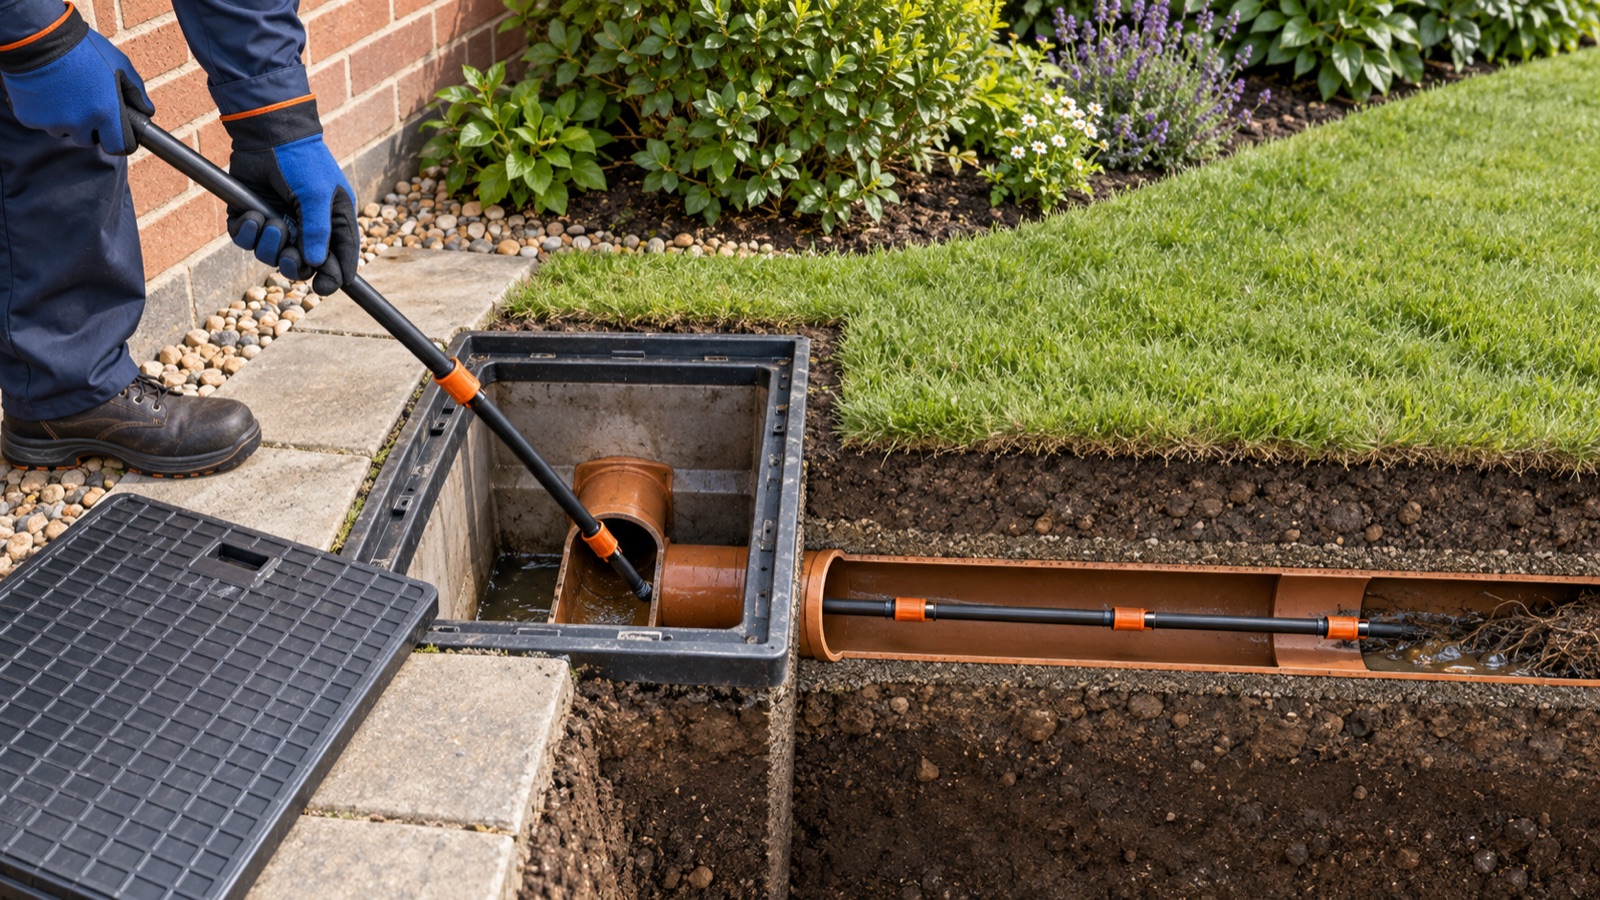
When drain rodding is—and is not—appropriate
Rodding can be reasonable when one private outdoor drain is blocked by a soft obstruction, the route is known, and there is a safe surface-level rodding point or shallow inspection chamber designed for access.
Do not start when:
- wastewater is flooding a home or reaching a watercourse;
- several properties are affected, which may indicate a public or shared sewer problem;
- the chamber is in a road, unstable, deep, damaged, surcharged or requires entry;
- the drain route, flow direction or outlet is unknown;
- chemical drain cleaner has been used;
- roots, concrete, rubble, a collapsed pipe or a displaced joint are suspected;
- the pipe is a pressurised service, water supply, gas duct or electrical duct; or
- you cannot lift and replace the access cover safely from ground level.
In England and Wales, responsibility can change where a drain becomes shared or crosses the property boundary. Check with the local wastewater company rather than assuming every chamber on the property is yours. Thames Water’s blocked-drain guidance shows the kinds of signs used to distinguish a private drain problem from a public sewer issue; arrangements differ by country and provider.
Never enter an inspection chamber or manhole
Drain rodding is performed from the surface. Do not climb or lean into a chamber, even if it appears shallow or has steps. Sewers and chambers can contain toxic or flammable gases, low oxygen, sudden flows and biological hazards. The UK Health and Safety Executive says confined spaces can present risks of fire, explosion, unconsciousness, asphyxiation and drowning in its confined-space guidance.
Keep children, pets and bystanders away. Do not smoke or use a flame near drainage access. If the cover cannot be opened and the work completed without entering or placing your head inside, use a drainage professional.
Choose rods, joints and attachments carefully
Use one compatible rod system in good condition. Do not mix joint patterns or improvise couplings.
Rod joints
- Universal screw joints are common on household rod sets. Many must be rotated clockwise only so they do not unscrew in the drain.
- Locking or lockfast joints may permit different movement, but only when assembled and used exactly as their instructions specify.
Check the instructions for your actual set before work. Monument Tools, for example, states “rotate clockwise only” for its universal-joint rods in its official drainage tool catalogue. That rule should not be assumed for a different joint design.
Common attachments
| Attachment | Typical role | Main limitation |
|---|---|---|
| Plain rod or guide | Following a known, open pipe route | Limited ability to retrieve a blockage |
| Rubber plunger or disc | Working a soft obstruction in a pipe of a suitable diameter | Can lodge at changes in diameter or push debris farther away |
| Double-worm or screw | Catching soft fibrous material | Can snag roots, wipes, damaged joints or protruding objects |
| Brush | Sweeping loose residue from a suitable bore | Not intended to cut concrete, roots or hard scale |
Use only an attachment rated by its manufacturer for the pipe size and task. A head that nearly fills the pipe may not pass a bend or diameter change. If the route is uncertain, start with the least aggressive approved head rather than a cutter or large disc.
For a closer comparison of plungers, worms, scrapers, guide wheels and brushes, use the drain rod attachments guide.
What you will need
- a complete, compatible drain-rod set and suitable attachment;
- the rod manufacturer’s instructions;
- the correct lifting key or tool for the access cover;
- waterproof, abrasion-resistant gloves and eye/splash protection;
- waterproof footwear and clothing that keeps wastewater off skin;
- waterproof dressings for any cuts;
- a container or heavy-duty bag for retrieved debris; and
- a hose or controlled water source for testing only after the blockage opens.
Raw sewage can transmit infection through the mouth, eyes and broken skin. HSE’s guidance on sewage exposure recommends minimising contact, protecting cuts, using appropriate waterproof PPE and washing hands carefully.
How to rod a drain step by step
1. Work out whether the problem is private and local
Ask whether neighbours have the same problem and check for wider flooding. Inside the property, note which fixtures are affected. If multiple ground-floor fixtures back up, do not keep discharging water while you investigate.
If a public or shared sewer may be involved, contact the relevant wastewater provider. For a single private outside drain, follow the blocked outside drain guide before choosing a tool.
2. Make the area safe
Stop all fixtures and appliances that feed the drain. Keep people and animals away, especially downhill from any overflow. Cover cuts, put on PPE and position yourself on stable ground where you can work without kneeling over the opening.
If sewage is already present, avoid splashing and do not use a pressure washer. Professional containment may be safer than DIY rodding.
3. Open only a safe, surface-level access point
Use the correct lifting tool. Covers can be unexpectedly heavy; do not pry with an improvised screwdriver or lift beyond your ability. Stand to the side as the cover opens and allow the area to ventilate naturally. Do not put your face over the opening, test the atmosphere with a flame or reach inside.
If the cover is seized, cracked, trafficked or too heavy, stop.
4. Identify the pipe route and direction of flow
Use the channel shape and known property layout to identify the inlet and outlet without entering the chamber. A clear downstream chamber with a backed-up upstream chamber can help locate the blocked section, but never assume a branch destination.
Where a safe downstream access point is available, rodding upstream towards the blockage can allow loosened debris to travel back to the open chamber for removal. Other layouts require a purpose-made upstream rodding eye. Use only the route you can identify; feeding rods blindly risks sending them into the wrong branch or trapping them at a junction.
5. Assemble the first rod and attachment
Inspect every rod for splits, severe bends and loose or damaged ferrules. Reject damaged components. Connect the selected head and first rod on the surface, tightening the joint as instructed.
Count the rods before insertion and keep unused rods laid out in order. Record the count if more than a few will be used; every component must come back out.
6. Feed one rod at a time
Guide the first rod into the known pipe opening. Push steadily without a sharp jab. Add the next rod while the previous joint remains accessible and under control. Secure each connection before it enters the drain.
Maintain a gentle curve rather than folding a rod sharply at the chamber edge. Do not stand directly behind a heavily flexed rod; stored tension can make it spring back.
7. Work the obstruction without unscrewing the rods
At resistance, stop pushing and rotate in the direction permitted by the manufacturer. With common universal screw joints this is normally clockwise only, both while advancing and withdrawing. Use short push–pull strokes and controlled rotation.
If the head will not advance:
- ease it back;
- reduce the bend at the access point;
- rotate gently in the permitted direction; and
- try one more controlled pass.
Do not use your full body weight, hammer a rod, attach a drill or wrench the rods anticlockwise. An immovable stop may be a junction, root mass, hard deposit or broken pipe rather than a soft blockage.
8. Retrieve debris and every rod
Once flow begins, do not allow a surge of wastewater to knock the rods or tools away. Withdraw gradually while continuing only the permitted rotation. Disconnect one rod at a time at the surface, maintaining control of the remaining line.
Place wipes, fat, roots and other solids in a suitable waste container; do not push them into another branch or leave them in the chamber. Count rods and attachments as they come out and compare the total with the starting count.
If a joint separates or any part is missing, stop using the drain and tell a drainage professional exactly what remains and how far it is likely to be from the access point.
9. Test the drain conservatively
Remove loose material from the chamber, then introduce a modest flow of clean water from one known upstream fixture while watching from a safe surface position. The water should pass promptly without the upstream level rising or another branch backing up.
Increase the flow in stages. A single rush through a small hole is not proof that the full bore is clear. If the level rises again, stop the test.
10. Clean and close the site
Replace the access cover so it sits fully and securely in its frame. Clean and disinfect rods according to their manufacturer’s instructions, keeping contaminated equipment away from food and living areas. Remove PPE without touching contaminated outer surfaces and wash hands with soap and water.
Signs the result is successful
- the chamber returns to its normal level;
- a sustained test flow passes without backing up;
- the rods, head and all components have been retrieved;
- no joint, pipe or chamber has shifted or leaked; and
- the problem does not immediately return when other fixtures are tested one at a time.
Stop rodding and call a drainage professional if
- a rod binds, kinks, separates or cannot be retrieved;
- the same hard stop remains after two controlled attempts;
- roots, concrete, rubble, a displaced joint or pipe collapse are suspected;
- the blockage clears only briefly;
- wastewater rises faster or another branch backs up;
- the chamber or cover is damaged;
- the route requires a powered machine, water jet or chamber entry; or
- you cannot account for every rod and attachment.
Repeated blockage is a reason to diagnose the line, not to use more force. A CCTV drain survey can distinguish retained debris from root intrusion, poor fall, displaced joints and collapse. The drain rods versus drain snake comparison can also help select the correct method for a future local blockage.
Sources and further reading
Never enter a drain chamber. Rods can unscrew, jam or damage pipework if used blindly or turned the wrong way.